
Side Dishes
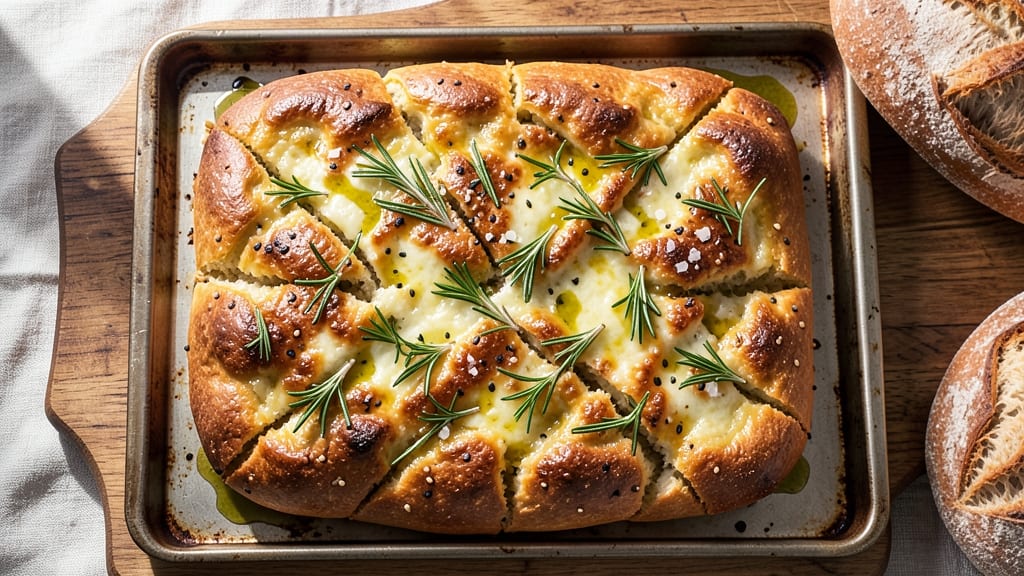
This Asiago cheese focaccia bread recipe delivers restaurant-quality pull-apart perfection with a crispy crust and gooey, melty cheese pockets—all achieved through a foil-sealed baking trick that locks in moisture and flavor. The nutty, slightly sweet Asiago transforms ordinary focaccia into something extraordinary, creating a golden, airy loaf with irresistible texture.
I developed this recipe after years of experimenting with cheese focaccia, and the foil method is the game-changer that ensures every bite stays tender and juicy.
The secret lies in the dough's simplicity—just flour, yeast, olive oil, and a touch of honey for subtle sweetness—paired with the bold, rich flavor of freshly grated Asiago.
Unlike traditional focaccia, this version uses a high-heat bake followed by a foil seal during the final minutes, which prevents over-browning while keeping the interior soft and the cheese perfectly melted. The result?
A loaf with crisp edges, a stretchy, airy crumb, and pockets of melted Asiago that pull apart effortlessly.
Perfect for appetizers, charcuterie boards, or a hearty side dish, this focaccia is designed to impress with minimal effort. The Asiago adds depth and a satisfying chewiness, while the olive oil and rosemary infuse every bite with aromatic richness.
Whether you're hosting a dinner party or simply craving a warm, cheesy loaf, this recipe delivers foolproof results that taste like they came from a gourmet bakery.
Once baked, let it rest for 10 minutes before slicing—this ensures clean, crisp cuts that showcase the golden crust and melted cheese inside. Serve warm with olive oil for dipping, or pair it with cured meats and fresh vegetables for a complete spread.
The foil-sealed technique isn’t just a trick; it’s the key to perfectly balanced texture and flavor every time.
Ingredients for asiago cheese focaccia bread
Sixteen ingredients transform into golden, pull-apart focaccia perfection with crisp edges and gooey cheese pockets.
| Ingredient | Amount | Notes |
|---|---|---|
| All-Purpose Flour 🌾 | 4 cups | Sifted for light texture |
| Active Dry Yeast 🍞 | ¼ oz | Or 2 1/4 tsp (1 packet) |
| Granulated Sugar 🍚 | 1 tbsp | For yeast activation |
| Extra-Virgin Olive Oil 🫒 | 1 ¼ cups | High quality, fruity |
| Warm Water 💧 | 1 ¼ cups | 110°F for yeast activation |
| Honey 🍯 | 2 tbsp | For subtle sweetness |
| Diamond Crystal Kosher Salt 🧂 | 1 ½ tsp | Adjust to taste |
| Fresh Rosemary 🌿 | 2 tbsp | Finely chopped, stems removed |
| Asiago Cheese 🧀 | 2 cups | Freshly grated, coarse |
| Aluminum Foil 📄 | 1 sheet | For sealing during bake |
| Coarse Sea Salt 🧂 | 2 tbsp | For topping before bake |
| Black Pepper 🌶️ | ½ tsp | Freshly ground |
The Asiago is non-negotiable here—freshly grated from a wedge (pre-shredded gets clumpy). Whole Foods or specialty cheese shops carry the best quality, but any Italian market will have it. Look for blocks with vibrant color and no orange tint—this indicates real Asiago, not a Parmesan blend. The flour should be sifted for that signature airy texture, and King Arthur or Bread Flour will give you the best rise. Fresh rosemary makes all the difference; dried works in a pinch but lacks that piney aroma. Store your yeast in the freezer—it lasts 6-12 months and stays potent.
No fresh rosemary? Dried at half the amount works, but toast it first in a dry pan for 30 seconds to wake up the flavor. Substituting cheese? Parmigiano-Reggiano gives a sharper bite, while Pecorino Romano adds earthiness. Running low on olive oil? Avocado oil works in a pinch, though it lacks the fruity notes. The honey can be swapped for maple syrup, but honey's subtle floral notes pair perfectly with Asiago. For the yeast activation, make sure your water is 110°F—too hot kills it, too cool makes it sluggish. If your yeast packet says 'rapid-rise,' halve the amount since it's more potent.
This dough doubles in size, so don't cram it into a 9x13-inch pan—it'll overflow. Let it rise in a warm spot (like a turned-off oven with a bowl of hot water) until puffy, about 1-2 hours. The foil-sealed trick is key: tent with foil during the final 15 minutes of baking to lock in moisture. Store leftovers wrapped at room temperature for 2 days, or freeze for 3 months. For reheating, wrap slices in foil and warm at 350°F for 5-10 minutes—they'll be just as crispy as fresh.
Why You'll Love This Recipe
- Five-Ingredient Magic: I swear, this focaccia only needs flour, yeast, sugar, olive oil, and water—plus the asiago—to feel like a restaurant-worthy loaf. No fancy mixers or last-minute grocery runs here.
- Crispy-Creamy Obsession: That first bite? Buttery crust cracking under your teeth, then melting asiago so rich it practically sings. Honestly, I’ve made focaccia before, but this one actually tastes like it belongs on a charcuterie board.
- Weeknight Wonder: Toss it in the oven while you sauté dinner—it’s done just as your pasta’s al dente. Or bake it Sunday, then snack on it all week. My lazy Sundays thank me every time.
- Leftover Goldmine: One loaf stretches to four meals: toast for breakfast, sandwiches for lunch, and dinner croutons. Between us, I’ve even microwaved a slice for a 3 AM craving—it’s that good.
Step-by-step instructions for Asiago cheese focaccia bread
Here's how to create a golden, pull-apart focaccia with a foil-sealed crust that locks in moisture and flavor.
Activate the Yeast and Mix the Dough
In a large bowl, combine the 1.25 cups warm water (about 110°F), 1 tbsp granulated sugar, and 0.25 oz active dry yeast. Let it sit for 5-10 minutes until frothy—this confirms the yeast is active. If it doesn’t bubble, your bread won’t rise properly.
In a separate bowl, whisk together the 4 cups all-purpose flour and 1.5 tsp diamond crystal kosher salt. Create a well in the center and pour in the yeast mixture along with the 1.25 cups extra-virgin olive oil and 2 tbsp honey. Mix with a wooden spoon until a shaggy dough forms, then knead by hand for 5-7 minutes until smooth and elastic. The dough should be slightly tacky but not sticky.
Incorporate Cheese and Rosemary
Transfer the dough to a lightly oiled bowl, cover with a damp towel, and let it rise in a warm place for 1 hour or until doubled in size. While it rises, finely grate the 2 cups asiago cheese and chop the 2 tbsp fresh rosemary (remove stems). Once the dough has risen, punch it down to release air, then fold in the cheese and rosemary by hand until evenly distributed.
This step ensures the cheese melts into pockets during baking, creating that signature gooey texture. If the dough feels too stiff, let it rest for 10 minutes—it’ll soften as it warms.
Shape and First Rise in the Pan
Lightly grease a 9x13-inch baking pan with olive oil. Transfer the dough to the pan, stretching it gently to fit the edges. Use your fingers to dimple the top, creating pockets for cheese and oil. Cover again and let it rise for 30-45 minutes until puffy and nearly doubled. The dough should spring back slowly when pressed.
Preheat your oven to 425°F while the dough rises. This high heat is key for achieving that crispy, golden crust. If the dough doesn’t rise enough, don’t force it—just bake it as is for a denser but still flavorful loaf.
Drizzle, Top, and Foil-Seal for Juice Lock
Once the dough has risen, drizzle ¼ cup extra-virgin olive oil evenly over the top, letting it soak in for 5 minutes. Sprinkle 2 tbsp coarse sea salt and 0.5 tsp black pepper over the surface, then press lightly to create dimples. This step maximizes surface area for browning and flavor.
Bake uncovered for 15 minutes until the edges begin to golden. Then, loosely cover the pan with the 1 sheet aluminum foil to trap steam and prevent over-browning. Return to the oven for 15-20 minutes until the center is set but still slightly soft to the touch. The foil seal ensures the bread stays moist inside while developing a crisp exterior.
Finish with a Crispy Crust
Remove the foil and bake for an additional 5-10 minutes until the top is deep golden brown and crispy. The bread should pull apart easily but hold its shape—this is the perfect texture. Let it cool in the pan for 10 minutes before slicing, as the cheese will be molten hot.
Serve warm with olive oil for dipping or alongside soups and salads. The foil-sealed technique guarantees a bread that’s crisp outside and tender inside, with pockets of melted asiago cheese throughout. Store leftovers wrapped at room temperature for up to 3 days, or freeze for longer storage.
Pro Tips For Making Asiago Cheese Focaccia Bread
- Bloom the Yeast First: Skip mixing yeast directly into flour—it’s lazy and wastes time. Instead, dissolve it in warm water (110°F) with sugar for 5-10 minutes until frothy. This guarantees your dough rises properly, especially when adding heavy cheese like asiago later.
- Oil the Dough Well: Don’t just drizzle olive oil over the dough—work it in until every crumb glistens. The asiago will melt better into pockets of fat, creating that signature creamy, pull-apart texture. (Yes, it’s messy, but worth it.)
- Avoid Over-Kneading: Focaccia dough is delicate—knead just until smooth (about 5 minutes by hand). Overwork it, and the gluten tightens, making those airy holes disappear. Let the olive oil and yeast do the stretching for you.
- Preheat Pan Properly: Cast iron or a baking stone? Preheat both until a drop of water sizzles instantly. The asiago needs a hot surface to crisp up, not just bake. If your pan’s lukewarm, the cheese will steam instead of brown.
Troubleshooting this recipe
Dough Not Rising
If your dough fails to rise, check the yeast first—it might be expired or stored improperly. I always test mine by dissolving ½ tsp yeast in ¼ cup warm water with 1 tsp sugar; if it doesn't foam in 5 minutes, replace it.
Also, ensure your water is 110°F—too hot kills yeast, too cool slows it. Place the bowl in a warm spot like a 300°F oven with the light on for consistent heat.
If the dough still doesn't rise, try adding 1 tsp sugar to the dough for extra yeast activation. 🌡️
Cheese Not Melting
For perfectly melted Asiago, grate it freshly using a microplane or box grater—pre-shredded cheese contains anti-caking agents that prevent smooth melting. Distribute the cheese evenly in the dough before the final rise so it gets baked into pockets.
If your oven runs hot, tent the focaccia with foil 10 minutes earlier than directed to prevent over-browning before the cheese melts. I also recommend baking on the middle rack for even heat distribution. 🧀
Crust Too Soft
A soft crust usually means the bread didn't bake long enough or the oven wasn't hot enough. Preheat your oven for at least 30 minutes before baking to ensure it reaches 425°F.
After the initial 15 minutes uncovered, cover with foil for 15-20 minutes to trap steam, then remove the foil and bake for an additional 5-10 minutes until golden and crisp. If your kitchen is humid, increase the foil-covered time by 5 minutes to compensate. 🔥
Dough Too Sticky
If your dough feels too sticky, it might need more flour—but don't overdo it. Sprinkle 1 tbsp flour at a time while kneading until it's just tacky to the touch. Alternatively, let it rest for 10-15 minutes before shaping; the gluten relaxes and absorbs excess moisture.
For extra insurance, chill the dough in the fridge for 20 minutes before shaping in the pan. This also helps with handling and prevents spreading too much during baking. ✨
Uneven Baking
Uneven baking often happens if the dough isn't distributed evenly in the pan or if the oven isn't calibrated. Before baking, use a 9x13-inch offset spatula to gently press the dough into the corners of the pan.
Rotate the pan halfway through baking (after the first 15 minutes) for even browning. If your oven has hot spots, place a baking sheet on the lower rack during preheating to distribute heat more evenly. A thermometer probe helps monitor internal temperature—aim for 190-200°F in the center. 🌡️
Nutrition facts
Frequently asked questions
Can I substitute Asiago cheese in this focaccia?
For a sharper flavor, use Parmigiano-Reggiano (grate it fresh). Pecorino Romano adds earthy notes, while Gruyère gives a creamy, nutty alternative. Just grate it freshly—pre-shredded cheeses contain anti-caking agents that prevent smooth melting.
How do I know when the focaccia is fully baked?
The bread is done when it's deep golden brown, pulls apart easily but holds its shape, and reaches an internal temperature of 190-200°F. Tap the bottom—it should sound hollow. The foil-sealed method helps prevent over-baking while keeping the interior tender.
Why does my focaccia turn out dense instead of airy?
Over-kneading or under-proofing causes dense focaccia. Knead just until smooth (5-7 minutes) and let it rise until puffy (about 1-2 hours). If your kitchen is cold, place the dough bowl in a 300°F oven with the light on for consistent warmth.
Can I make this focaccia ahead of time?
Yes! Bake it 1 day ahead and store wrapped at room temperature. For longer storage, freeze it (up to 3 months). To reheat, wrap slices in foil and warm at 350°F for 5-10 minutes—they'll be crispy again! Perfect for meal prep.
What’s the best way to serve this focaccia?
Serve warm with extra-virgin olive oil for dipping, or pair it with charcuterie, soups, or salads. The crispy crust and melted cheese make it ideal as an appetizer or side. For a gourmet touch, sprinkle with flaky sea salt and fresh rosemary before serving.